Migrating a storage backend from TrueNAS Core to TrueNAS Scale can be fraught with surprises. For instance, many assume the only way to integrate TrueNAS Scale with Kubernetes is through the democratic-csi API drivers, which are explicitly marked as “experimental“. While these drivers promise flexibility, their instability—especially under demanding workloads like OpenShift Virtualization—lives up to their “beta” label. Persistent VM creation failures and erratic behavior often necessitate rethinking the approach.
The Realization:
Fortunately, the SSH key-based drivers (proven stable with TrueNAS Core) remain compatible with TrueNAS Scale! However, the migration requires adjustments due to differences between Core and Scale. Here’s what you need to do.
Configure SSH Access
Configuring SSH access on TrueNAS Scale is pretty different from how you configure SSH access on TrueNAS Core, and the process was far from intuitive.
- Enable the SSH service
From the TrueNAS web UI, navigate to System Settings > Services and toggle the SSH server on. Make sure to check the Start Automatically box

-
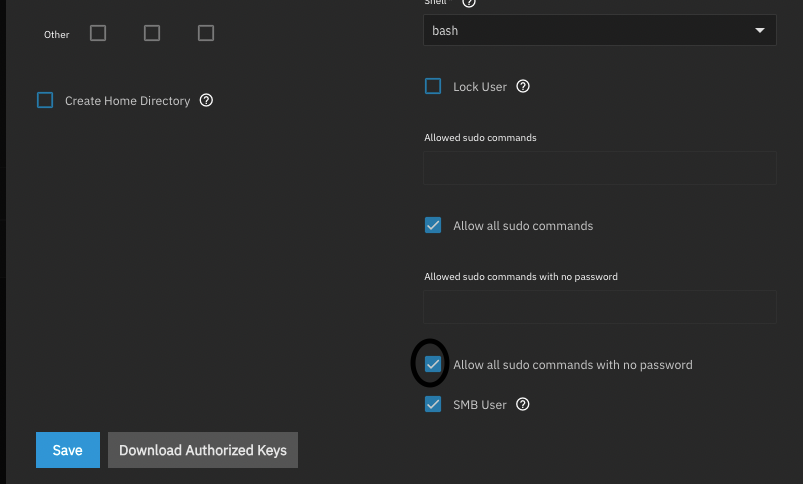
configure passwordless sudo for the admin user
Navigate to Credentials > Local Users > admin and select Edit. Under the admin user config screen, toggle Allow all sudo commands and Allow all sudo commands with no password and click save
-
Create the SSH keys
This part was extremely unintuitive. To create an SSH keypair for an account you have to navigate to Credentials > Backup Credentials > SSH Connections and select Add. Then under the ‘New SSH Connection’ wizard, configure your connection as follows
Name: admin@192.168.50.23
Setup Method: Semi-automatic
TrueNAS URL: https://192.168.50.23
Admin Username: admin
Admin Password: <password>
Username: admin
Enable passwordless sudo for zfs commands ***very important!
Private Key: Select 'Generate New'
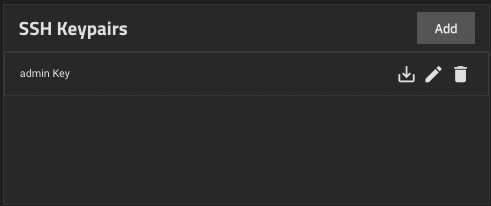
- Add the SSH key to the admin user Navigate to Credentials > Backup Credentials > SSH Keypairs and download the new keypair that was generated.
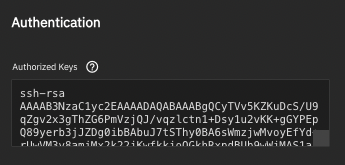
Copy the contents of the SSH public key. Navigate back to Credentials > Local Users > admin and pasted the contents of the SSH public key into the Authorized Keys section under the admin user account.
Login using the key to see if the key works

Create an API key
Although the standard drivers use SSH keys to do the actual provisioning tasks, they still use the API to determine things about the system like the version of TrueNAS you’re running. To generate an API key, click on the User icon up in the top right corner and select API Keys.
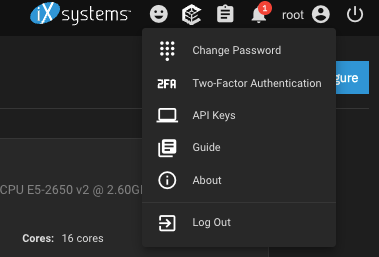
Then click on Add API Key and provide a unique name for the key.
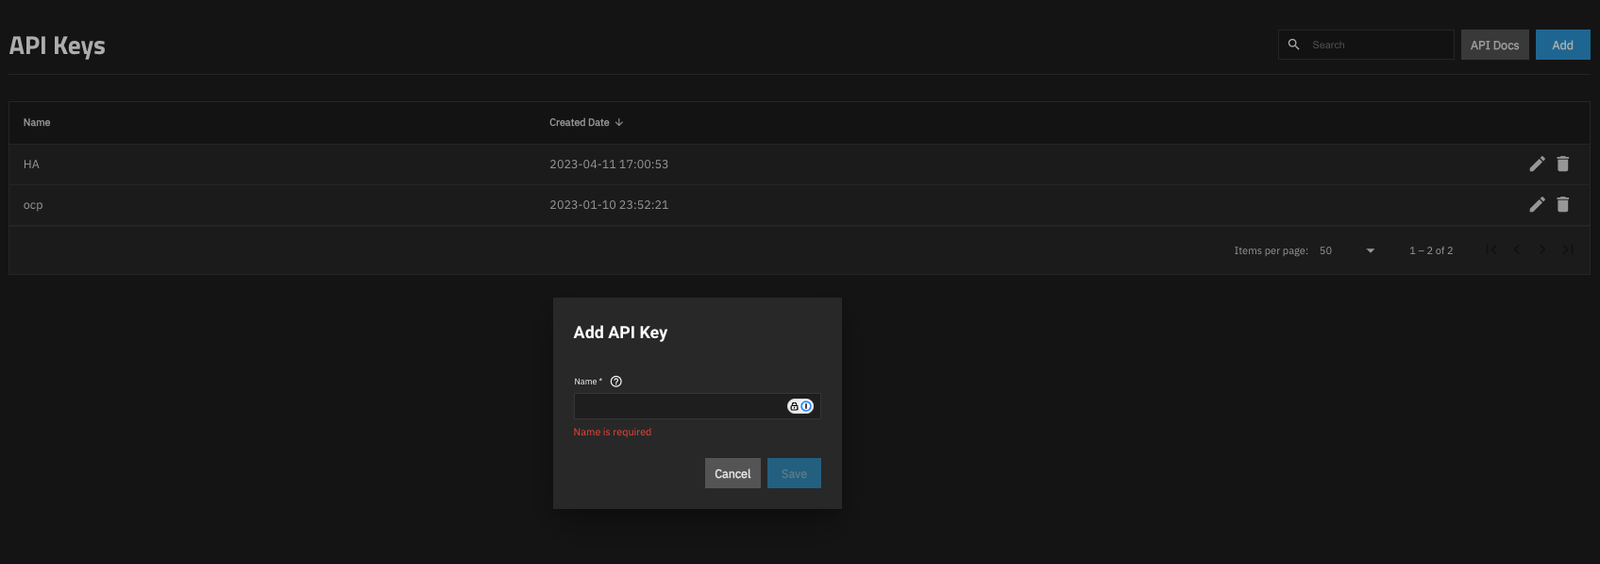
Copy the API key generated and keep it some where safe
Configure NFS
First, you need to make sure the NFS service is enabled and listening on the appropriate interface(s). You can also just allow it to listen on all interfaces by not specifying any specific interface. Navigate to System Settings > Services and toggle the NFS service to on, and make sure it’s set to start automatically.
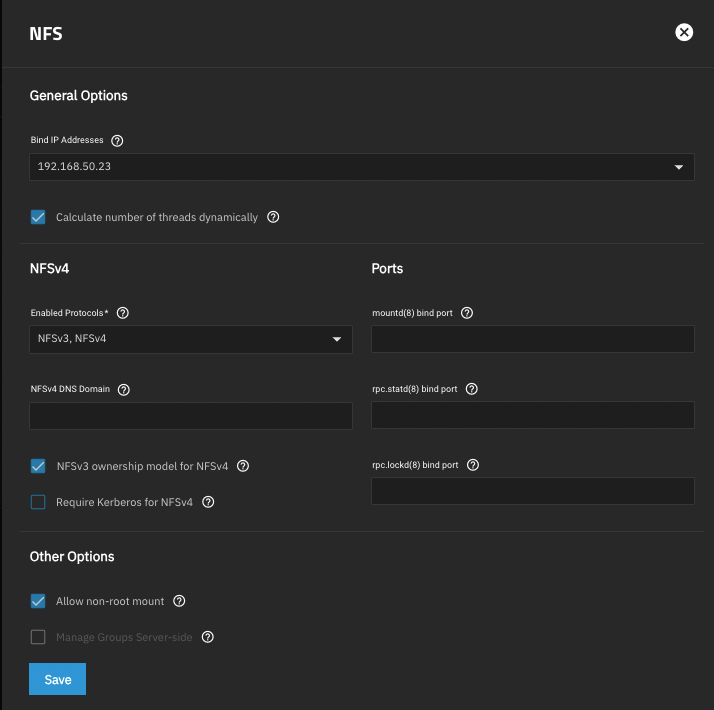
Then we need to make sure the parent datasets for volumes and snapshots exist at the appropriate paths.
/mnt/pool3/ocp-pool3/nfs
Configure iSCSI
iSCSI is a little more complicated to set up than NFS. I don’t use CHAP authentication so it’s not that bad to set up. First, navigate to System Settings > Services and toggle on the iSCSI service, and make sure it’s set to start automatically.

I set my portal to listen on all interfaces to keep things simple, but just like NFS, you can limit it to a specific interface(s) which would be very useful if you have, eg; a separate 10GBe storage area network (SAN) and you want to segregate iSCSI traffic to that. Worth noting, if you go down this route, you’d probably want to enable jumbo frames (9000 MTU) on the interface, but that is not within the scope of this tutorial.
Create your first portal
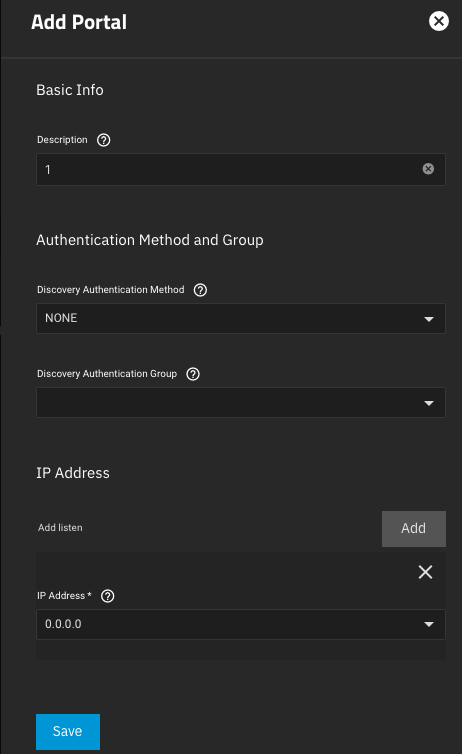
In my case, I have portal 1 which listens on all interfaces on port 3260 TCP, or 0.0.0.0:3260 and it does not use CHAP authentication.
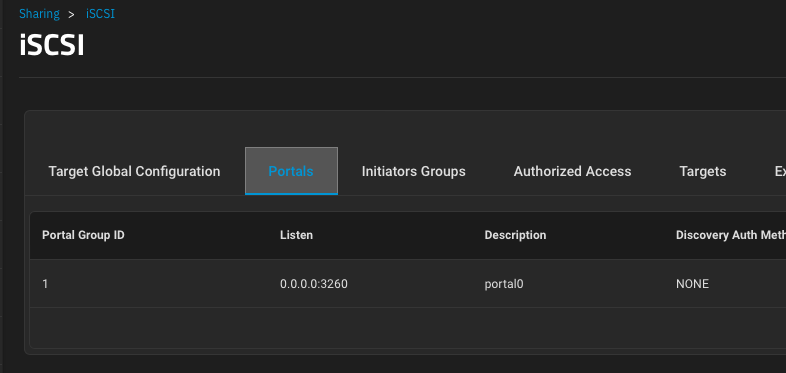
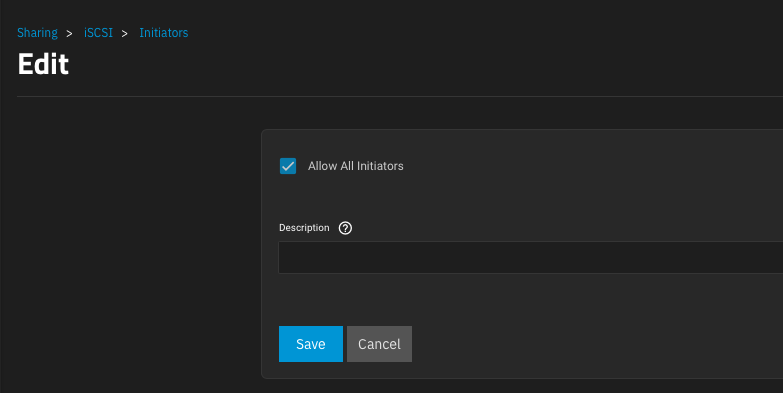
and I’ve created Initiator Group 1 and configured the iSCSI service to allow all initiators. Again, you can really tighten down the security on this if you want, but it isn’t necessary in my lab.
Then create your initiatiator group. Select Allow All Initiators. You don’t necessarily have to give it a description.
Deploy Democratic CSI
Now with NFS and iSCSI configured, and our API key and SSH keys in hand, we can deploy democratic-csi. Democratic-csi is typically deployed as a helm chart, you just need to provide it values.yaml files for the NFS and iSCSI services. These are the values files that worked for me
csiDriver:
  # should be globally unique for a given cluster
  name: "org.democratic-csi.nfs"

storageClasses:
- name: truenas-nfs-csi
  defaultClass: false
  reclaimPolicy: Delete
  volumeBindingMode: Immediate
  allowVolumeExpansion: true
  parameters:
    fsType: nfs

  mountOptions:
  - noatime
  - nfsvers=4
  secrets:
    provisioner-secret:
    controller-publish-secret:
    node-stage-secret:
    node-publish-secret:
    controller-expand-secret:

# if your cluster supports snapshots you may enable below
volumeSnapshotClasses: []
#- name: truenas-nfs-csi
#  parameters:
#  # if true, snapshots will be created with zfs send/receive
#  # detachedSnapshots: "false"
#  secrets:
#    snapshotter-secret:

driver:
  config:
    driver: freenas-nfs
    instance_id:
    httpConnection:
      protocol: http
      host: 192.168.50.23
      port: 80
      username: root
      password: redhat123
      allowInsecure: true
    sshConnection:
      host: 192.168.50.23
      port: 22
      username: admin
      # use either password or key
      # password: ""
      privateKey: |
        -----BEGIN OPENSSH PRIVATE KEY-----
        b3BlbnNzaC1rZXktdjEAAAAABG5vbmUAAAAEbm9uZQAAAAAAAAABAAABlwAAAAdzc2gtcn
        ....
        AYqN9MXKuE8TcAAAAMcm9vdEB0cnVlbmFzAQIDBAUGBw==
        -----END OPENSSH PRIVATE KEY-----

    zfs:
      cli:
        sudoEnabled: true
        paths:
          zfs: /usr/sbin/zfs
          zpool: /usr/sbin/zpool
          sudo: /usr/bin/sudo
          chroot: /usr/sbin/chroot
      datasetParentName: pool3/ocp-pool3/nfs/vols
      detachedSnapshotsDatasetParentName: pool3/ocp-pool3/nfs/snaps
      datasetEnableQuotas: true
      datasetEnableReservation: false
      datasetPermissionsMode: "0777"
      datasetPermissionsUser: 0
      datasetPermissionsGroup: 0
    nfs:
      shareHost: 192.168.50.23
      shareAlldirs: false
      shareAllowedHosts: []
      shareAllowedNetworks: []
      shareMaprootUser: root
      shareMaprootGroup: wheel
      shareMapallUser: ""
      shareMapallGroup: ""
For iSCSI
csiDriver:
  # should be globally unique for a given cluster
  name: "org.democratic-csi.iscsi"

# add note here about volume expansion requirements
storageClasses:
- name: truenas-iscsi-csi
  defaultClass: false
  reclaimPolicy: Delete
  volumeBindingMode: Immediate
  allowVolumeExpansion: true
  parameters:
    # for block-based storage can be ext3, ext4, xfs
    fsType: ext4

  mountOptions: []
  secrets:
    provisioner-secret:
    controller-publish-secret:
    node-stage-secret:
    node-publish-secret:
    controller-expand-secret:

driver:
  config:
    driver: freenas-iscsi
    instance_id:
    httpConnection:
      protocol: http
      host: 192.168.50.23
      port: 80
      # use only 1 of apiKey or username/password
      # if both are present, apiKey is preferred
      # apiKey is only available starting in TrueNAS-12
      #apiKey:
      username: root
      password: redhat123
      allowInsecure: true
      # use apiVersion 2 for TrueNAS-12 and up (will work on 11.x in some scenarios as well)
      # leave unset for auto-detection
      #apiVersion: 2
    sshConnection:
      host: 192.168.50.23
      port: 22
      username: admin
      # use either password or key
      # password: ""
      privateKey: |
        -----BEGIN OPENSSH PRIVATE KEY-----
        b3BlbnNzaC1rZXktdjEAAAAABG5vbmUAAAAEbm9uZQAAAAAAAAABAAABlwAAAAdzc2gtcn
        ....
        AYqN9MXKuE8TcAAAAMcm9vdEB0cnVlbmFzAQIDBAUGBw==
        -----END OPENSSH PRIVATE KEY-----
    zfs:
      # can be used to override defaults if necessary
      # the example below is useful for TrueNAS 12
      cli:
        sudoEnabled: true
      #
      #  leave paths unset for auto-detection
        paths:
          zfs: /usr/local/sbin/zfs
          zpool: /usr/local/sbin/zpool
          sudo: /usr/local/bin/sudo
          chroot: /usr/sbin/chroot

      # can be used to set arbitrary values on the dataset/zvol
      # can use handlebars templates with the parameters from the storage class/CO
      #datasetProperties:
      #  "org.freenas:description": "{{ parameters.[csi.storage.k8s.io/pvc/namespace] }}/{{ parameters.[csi.storage.k8s.io/pvc/name] }}"
      #  "org.freenas:test": "{{ parameters.foo }}"
      #  "org.freenas:test2": "some value"

      # total volume name (zvol/<datasetParentName>/<pvc name>) length cannot exceed 63 chars
      # https://www.ixsystems.com/documentation/freenas/11.2-U5/storage.html#zfs-zvol-config-opts-tab
      # standard volume naming overhead is 46 chars
      # datasetParentName should therefore be 17 chars or less when using TrueNAS 12 or below
      datasetParentName: pool3/ocp-pool3/iscsi/vols
      # do NOT make datasetParentName and detachedSnapshotsDatasetParentName overlap
      # they may be siblings, but neither should be nested in the other
      detachedSnapshotsDatasetParentName: pool3/ocp-pool3/iscsi/snaps
      # "" (inherit), lz4, gzip-9, etc
      zvolCompression:
      # "" (inherit), on, off, verify
      zvolDedup:
      zvolEnableReservation: false
      # 512, 1K, 2K, 4K, 8K, 16K, 64K, 128K default is 16K
      zvolBlocksize:
    iscsi:
      targetPortal: "192.168.50.23:3260"
      # for multipath
      targetPortals: [] # [ "server[:port]", "server[:port]", ... ]
      # leave empty to omit usage of -I with iscsiadm
      interface:

      # MUST ensure uniqueness
      # full iqn limit is 223 bytes, plan accordingly
      # default is "{{ name }}"
      #nameTemplate: "{{ parameters.[csi.storage.k8s.io/pvc/namespace] }}-{{ parameters.[csi.storage.k8s.io/pvc/name] }}"
      namePrefix: csi-
      nameSuffix: "-hub"

      # add as many as needed
      targetGroups:
        # get the correct ID from the "portal" section in the UI
        - targetGroupPortalGroup: 1
          # get the correct ID from the "initiators" section in the UI
          targetGroupInitiatorGroup: 1
          # None, CHAP, or CHAP Mutual
          targetGroupAuthType: None
          # get the correct ID from the "Authorized Access" section of the UI
          # only required if using Chap
          targetGroupAuthGroup:

      #extentCommentTemplate: "{{ parameters.[csi.storage.k8s.io/pvc/namespace] }}/{{ parameters.[csi.storage.k8s.io/pvc/name] }}"
      extentInsecureTpc: true
      extentXenCompat: false
      extentDisablePhysicalBlocksize: true
      # 512, 1024, 2048, or 4096,
      extentBlocksize: 512
      # "" (let FreeNAS decide, currently defaults to SSD), Unknown, SSD, 5400, 7200, 10000, 15000
      extentRpm: "7200"
      # 0-100 (0 == ignore)
      extentAvailThreshold: 0
Now it is time to deploy democratic-csi with helm. Following is the example of the command I use in my enviornment. Make sure that you have created a namespace with the name democratic-csi beforehand.
## For deploying nfs driver
helm upgrade --install --set controller.rbac.openshift.privileged=true --set node.rbac.openshift.privileged=true --set node.driver.localtimeHostPath=false --values truenas-nfs.yaml --namespace democratic-csi zfs-nfs democratic-csi/democratic-csi

## For deploying iSCSI driver
helm upgrade --install --set controller.rbac.openshift.privileged=true --set node.rbac.openshift.privileged=true --set node.driver.localtimeHostPath=false --values truenas-iscsi.yaml --namespace democratic-csi zfs-iscsi democratic-csi/democratic-csi
In the above command, zfs-iscsi is an arbitrary release name (choose one unique per deployment). The openshift flags ensure the driver’s Pods request the privileges they need on OpenShift.
- node.rbac.openshift.privileged=true and controller.rbac.openshift.privileged=true allow the creation of the necessary SecurityContextConstraints (SCC) or permissions so that the CSI Pods can run with privileged, host networking, and host mounts on OpenShift.
- node.driver.localtimeHostPath=false prevents the driver from trying to mount the host’s /etc/localtime (which OpenShift would normally disallow)
Once the drivers are installed successfully you will see following pods under democratic-csi namespace
oc get po -n democratic-csi
NAME                                                   READY   STATUS    RESTARTS         AGE
zfs-iscsi-democratic-csi-controller-58cddcbdd8-v2qk8   6/6     Running   204 (4d8h ago)   75d
zfs-iscsi-democratic-csi-node-vkbkx                    4/4     Running   70 (4d8h ago)    75d
zfs-nfs-democratic-csi-controller-6c98b96df5-c9n45     6/6     Running   203              75d
zfs-nfs-democratic-csi-node-g29gm                      4/4     Running   73 (4d8h ago)    75d
you will also see the following storageclasses in you cluster
oc get storageclass
NAME                           PROVISIONER                       RECLAIMPOLICY   VOLUMEBINDINGMODE      ALLOWVOLUMEEXPANSION   AGE
lvms-vg1                       topolvm.io                        Delete          WaitForFirstConsumer   true                   75d
lvms-vg1-immediate (default)   topolvm.io                        Delete          Immediate              true                   75d
openshift-storage.noobaa.io    openshift-storage.noobaa.io/obc   Delete          Immediate              false                  69d
truenas-iscsi-csi              org.democratic-csi.iscsi          Delete          Immediate              true                   75d
truenas-nfs-csi                org.democratic-csi.nfs            Delete          Immediate              true                   75d
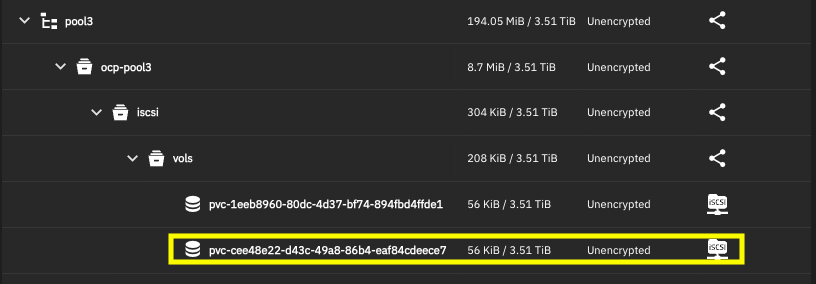
Now test by creating pvc with the truenas storageclasses
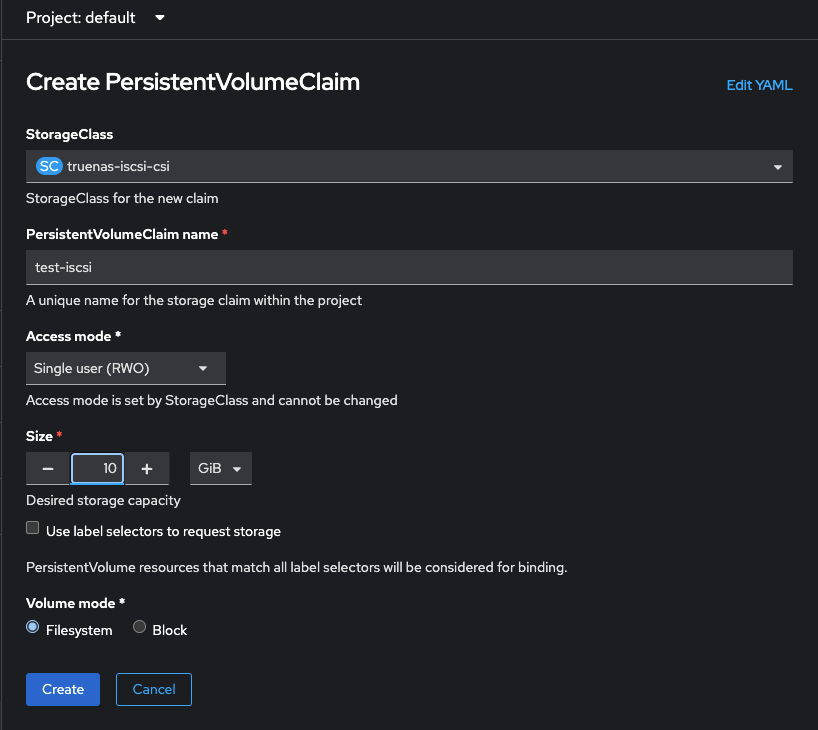
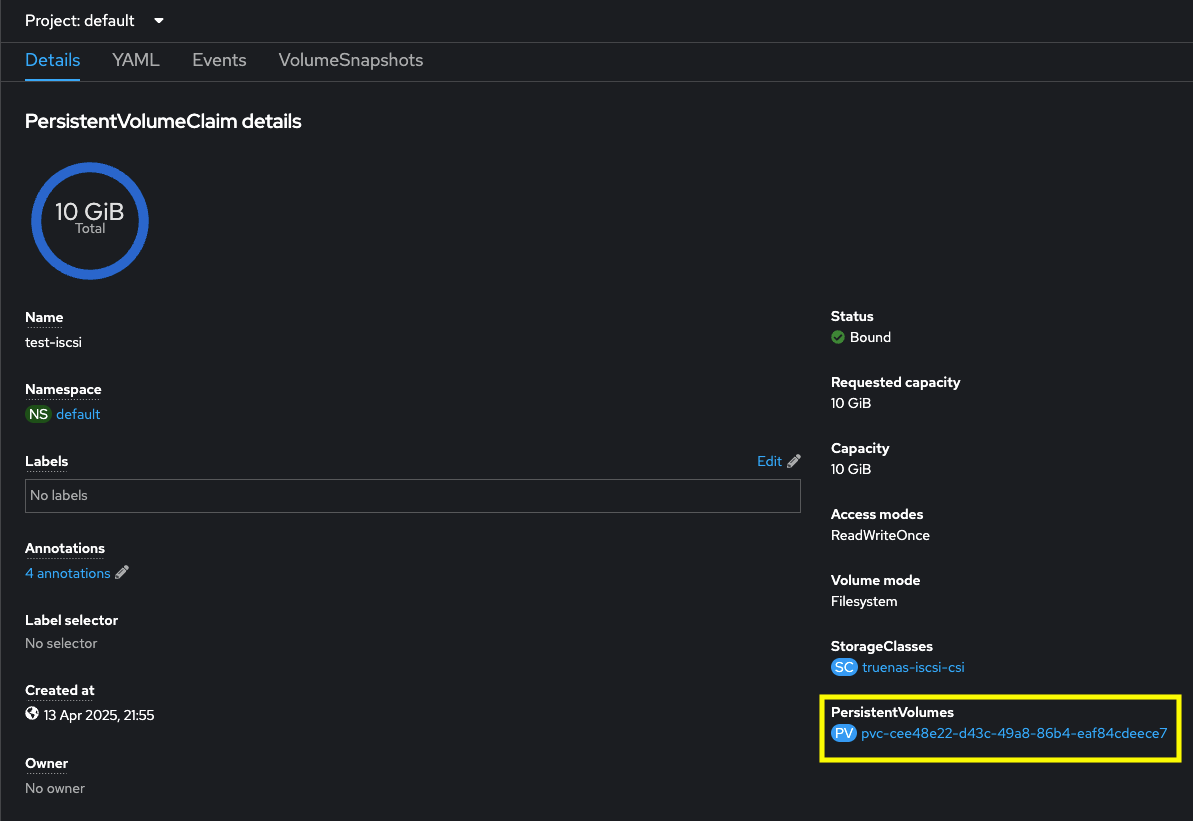
Now let us test the NFS storage driver
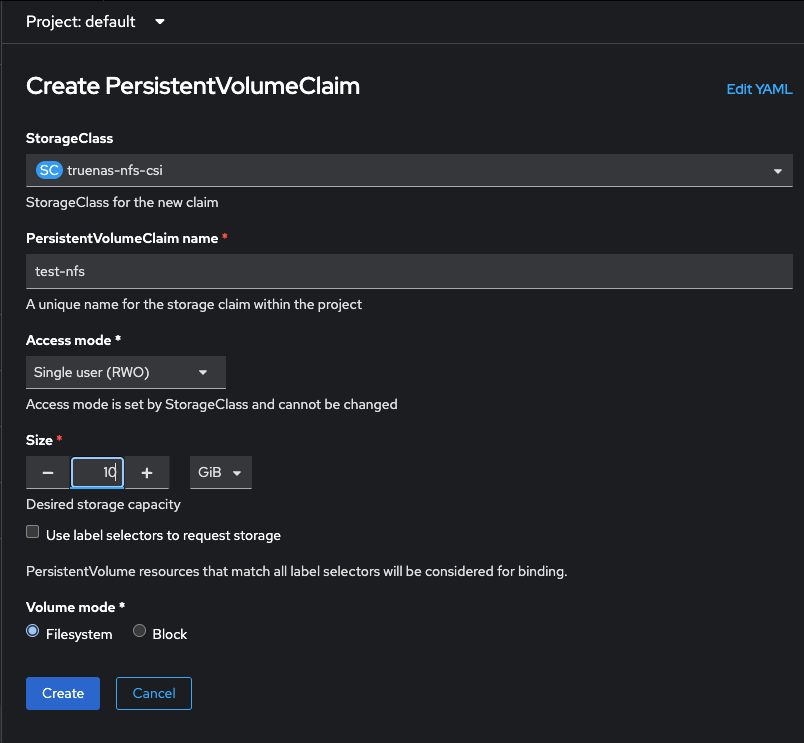
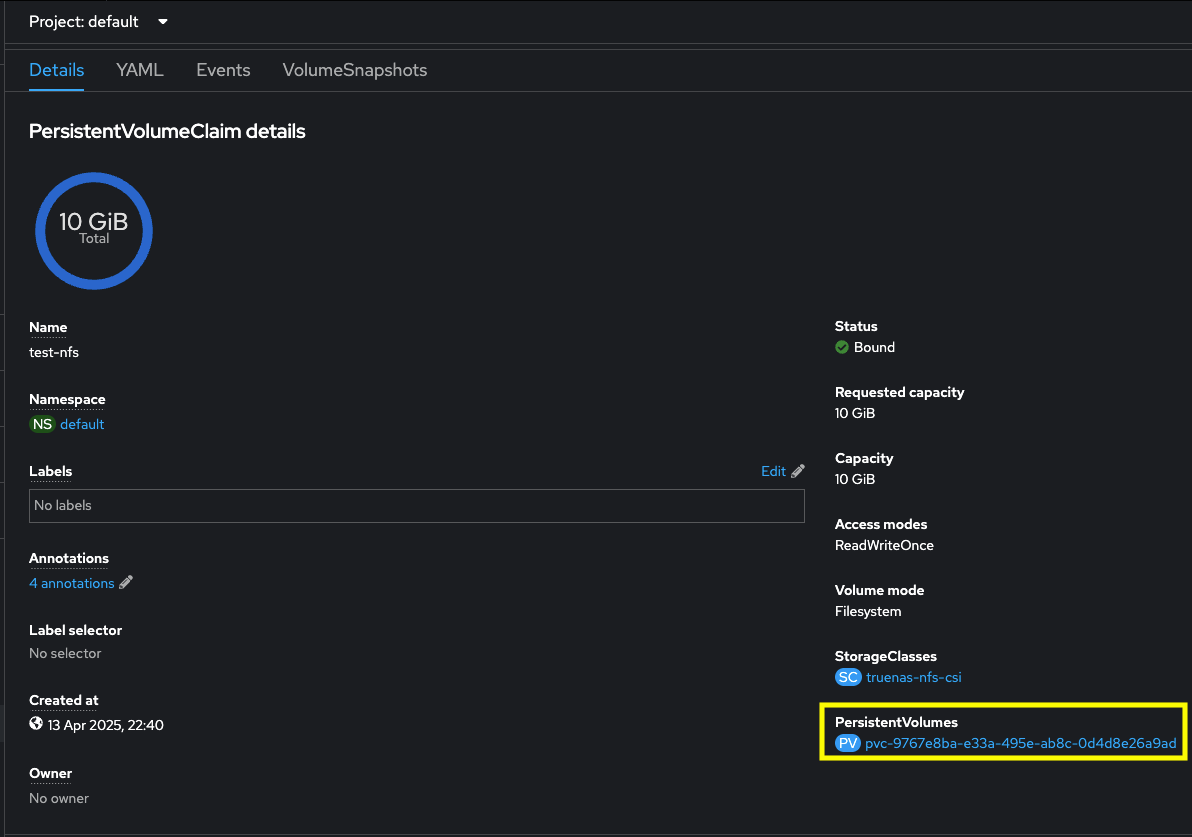
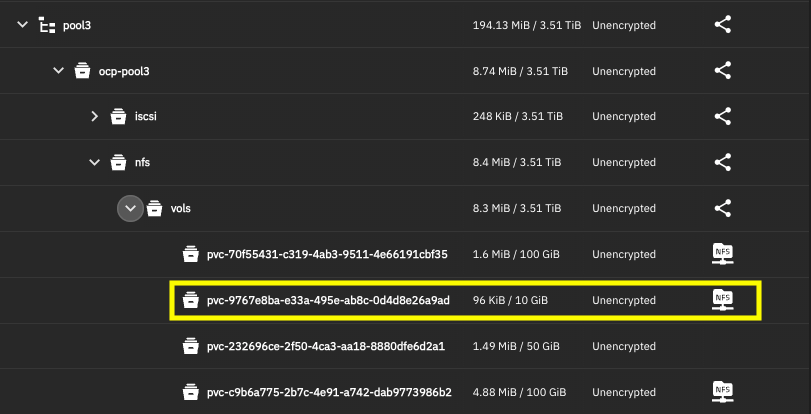
Installing democratic-csi snapshot controller
We will deploy democratic-csi snapshot controller using helm
helm repo add democratic-csi https://democratic-csi.github.io/charts/
helm repo update

helm upgrade --install --namespace kube-system --create-namespace snapshot-controller democratic-csi/snapshot-controller
oc -n kube-system logs -f -l app=snapshot-controller
I0414 02:52:48.980675       1 feature_gate.go:387] feature gates: {map[]}
I0414 02:52:48.981063       1 main.go:169] Version: v8.2.1
I0414 02:52:48.984836       1 envvar.go:172] "Feature gate default state" feature="ClientsAllowCBOR" enabled=false
I0414 02:52:48.984926       1 envvar.go:172] "Feature gate default state" feature="ClientsPreferCBOR" enabled=false
I0414 02:52:48.984972       1 envvar.go:172] "Feature gate default state" feature="InformerResourceVersion" enabled=false
I0414 02:52:48.985021       1 envvar.go:172] "Feature gate default state" feature="WatchListClient" enabled=false
I0414 02:52:48.989084       1 main.go:220] Start NewCSISnapshotController with kubeconfig [] resyncPeriod [15m0s]
I0414 02:52:49.036305       1 leaderelection.go:257] attempting to acquire leader lease kube-system/snapshot-controller-leader..
...
I0414 02:54:29.318532       1 leaderelection.go:293] successfully renewed lease kube-system/snapshot-controller-leader
Then with snapshot-controller deployed, you can create the appropriate VolumeSnapshotClasses , eg;
apiVersion: snapshot.storage.k8s.io/v1
deletionPolicy: Retain
driver: org.democratic-csi.iscsi
kind: VolumeSnapshotClass
metadata:
  annotations:
    snapshot.storage.kubernetes.io/is-default-class: "false"
  labels:
    snapshotter: org.democratic-csi.iscsi
    velero.io/csi-volumesnapshot-class: "false"
  name: truenas-iscsi-csi-snapclass

---

apiVersion: snapshot.storage.k8s.io/v1
deletionPolicy: Retain
driver: org.democratic-csi.nfs
kind: VolumeSnapshotClass
metadata:
  annotations:
    snapshot.storage.kubernetes.io/is-default-class: "false"
  labels:
    snapshotter: org.democratic-csi.nfs
    velero.io/csi-volumesnapshot-class: "true"
  name: truenas-nfs-csi-snapclass
Storage Profiles
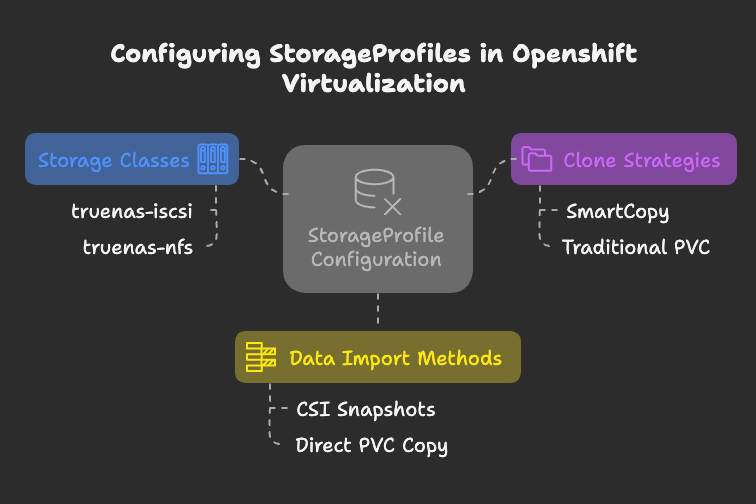
When using OpenShift Virtualization, you must configure StorageProfile custom resources (CRs) to ensure proper functionality. After deploying KubeVirt/CNV on an OpenShift cluster, a StorageProfile is automatically generated for each storage class. However, unless you’re using OpenShift Data Foundation (ODF), these profiles will lack critical details needed for KubeVirt to manage PVC creation, cloning, and data imports.
For example:
- The truenas-iscsi storage class supports RWO (ReadWriteOnce) and RWX (ReadWriteMany) block PVCs, as well as RWO filesystem PVCs.
- The truenas-nfs storage class enables RWX and RWO filesystem PVCs.
StorageProfiles also define how cloning and data import workflows operate. To enable fast cloning (referred to as SmartCopy), configure the StorageProfile with cloneStrategy: csi-snapshot and dataImportCronSourceFormat: snapshot. This allows VM templates to use CSI snapshots as boot sources, enabling near-instantaneous cloning. In contrast, methods like pvc or csi-import require full data copies, which are slower.
Note that the terminology can be inconsistent: “SmartCopy” is not explicitly named in the parameters but is enabled by the above settings. For deeper insights, consult the official StorageProfile documentation.
This configuration ensures efficient PVC management and optimizes performance for VM operations like cloning and snapshotting.
CDIDefaultStorageClassDegraded message
While using openshift virtualization you must have seen the CDIDefaultStorageClassDegraded alert message. You can get more information on this alert message from here. Following are patch commands to patch the storageprofiles
#!/bin/sh
# patch TrueNAS iSCSI and NFS storageprofiles

oc patch storageprofile truenas-iscsi-csi -p '{"spec":{"claimPropertySets":[{"accessModes":["ReadWriteMany"],"volumeMode":"Block"},{"accessModes":["ReadWriteOnce"],"volumeMode":"Block"},{"accessModes":["ReadWriteOnce"],"volumeMode":"Filesystem"}],"cloneStrategy":"csi-snapshot","dataImportCronSourceFormat":"snapshot"}}' --type=merge

oc patch storageprofile truenas-nfs-csi -p '{"spec":{"claimPropertySets":[{"accessModes":["ReadWriteMany"],"volumeMode":"Filesystem"}],"cloneStrategy":"csi-snapshot","dataImportCronSourceFormat":"snapshot","provisioner":"org.democratic-csi.nfs","storageClass":"truenas-nfs-csi"}}' --type=merge
Why this matters: Without this step, you might observe that when creating a new VM from a template, CNV falls back to host-assisted copy (copying the entire PVC), which is slow. With the above cloneStrategy set, it will attempt an instant CSI clone via snapshot. (Ensure you created the VolumeSnapshotClass for the driver, as discussed, so that snapshots actually work.)


